A few additions to Barnabas' crew!
A Bull Snapper. Pretty happy with the result on this one. Had to do a decent amount of greenstuff work to get rid of some of the part edges. Sculpted a wee bit around the eye for the gash. Did a subtle striped pattern for the body, which I plan to do for the rest of my gators as I build them up, as well as the swamp bases for each model.
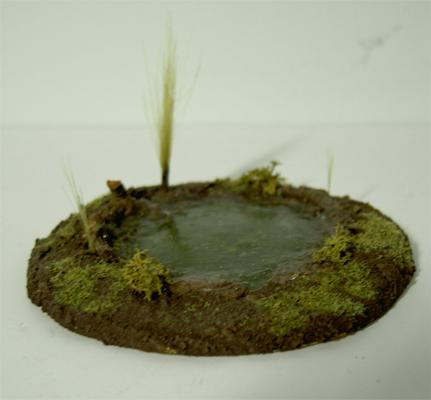
Also created a Swamp Pit Marker for Barnabas' Swamp Pit spell as well as the tier/pact swamp zone bonuses.
This one was pretty fun to make, as I don't often do much terrain work. After cleaning up my desk, I found a lid to a Pringles can. Wondered if it could work as a terrain base and turn out it was 3" diameter, which worked out great! After watching a vid, I went through with it make it with DryDex Spackle, some sand, and some water effects. Tossed some fine grade flock into the water effects to give it a light algae look. The Pringles lid is a bit soft and isnt exactly flat, but it was a good first experiment. Actually nice since it has a slight curve to it where it allows a little bit underneath it and still lays flat.
Followed this tutorial series to make it, make a few substitutes for what I had on hand.
http://www.youtube.com/watch?v=pzA9UIe7dHg
Thursday, November 10, 2011
Saturday, November 5, 2011
All them teeth and no toothbrush...
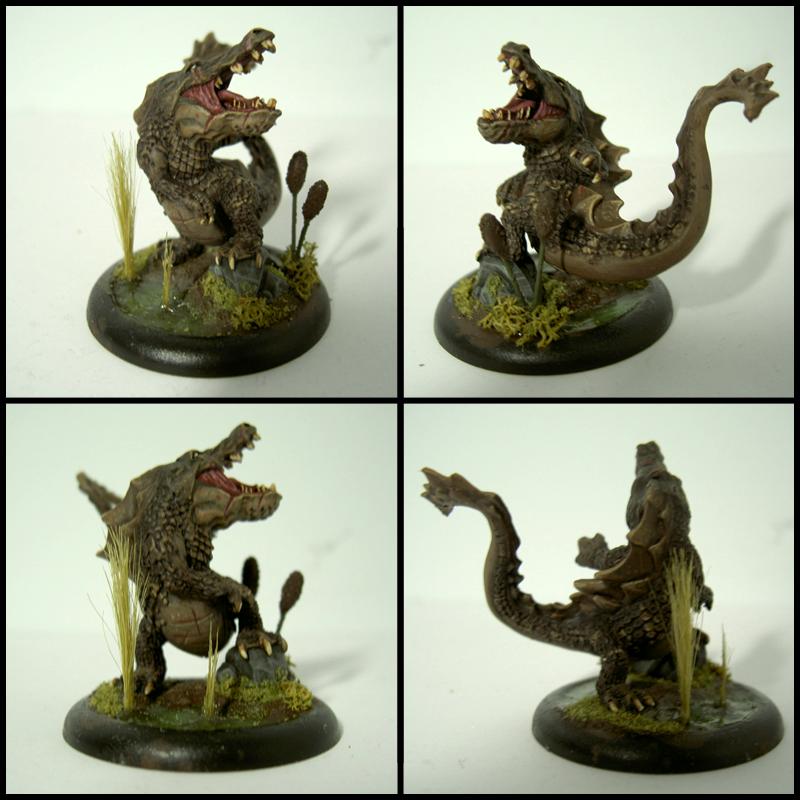
My completed Bloody Barnabas.Very pleased with the swamp basing on this. My first actual detailed, multi-texture base, as I usually stick to plain basalt and gravel. Decided to go with a darker, muted color pallet, painting Barnabas with more of an American Alligator skin.
The base was done with a little bit of Spackle (Drydex brand, pink to white dry indication is fantastic), sand from the side of my pool, field grass and a bit of fine green flock. The branches are twigs I pulled from the backyard. Unfortunately I bought Water Effects (a thicker more moldable gel, instead of the regular water stuff, but it worked well enough. A bit of greenstuff on a pin and theres a few cattails.
Also building 3" swamp markers, using the same method. It'll be nice to have a good visual when I do Swamp Pit and toss around all the shallow water!
Tuesday, November 1, 2011
Back into the fray.
Just recently decided to hop into my FLGS's Friday 40k league nights, and am very happy with doing so. Although I'm not entirely content with the current edition, it was enjoyable playing a new opponent for what has seemed like ages (actually probably over 6 years since I've played a pickup game with a stranger).
Decided to bring my Salamanders to the table since I'm most comfortable in power armor. No love for the Orks this week, but maybe I'll throw down with them later on. My opponent was a Tau force and we played a short 770pt game. We rolled for the mission and it was a King of the Hill with Night Fight on the first turn. Although the player was new, he was a quick learner and it was nice for me since I had forgotten many rules myself.
I managed to nuke myself on my first turn by having my Librarian use Gate of Eternity and scatter a whole squad into difficult terrain, killing 5 of them, 2 of which were special weapons. In the subsequent turn, the rest of the squad was shot to death by Fire Warriors, leaving the Librarian alone. Fortunately enough, his Terminator Armor proved worthwhile and he survived without a scratch.
As I marched my other two tactical squads up to the objective, the Librarian assaulted the nearby Fire Warriors squad and tying them up for the remainder of the game. Slight opposition was met when the Tau Commander jumped in, by after a few whiffs with my Force Weapon, I finally killed him, passing my psychic test and killing him outright. The Librarian continued to tie up the fire warriors while the tactical squads controlled the objective. A bit shot up by the ended of the game, which was cut short at turn 5 due to the store closing, but they still got the job done.
Definitely looking forward to this weeks games. Eye'd up some of the other players while I waited around, gauging what I may need to take for the future.Overall I'm enjoying the points system. Start off with only Troops and HQ available and as you progress, Elites, Fast Attack and Heavy Support open up, as well as special characters. And a few more games and Vulkan He'Stan will be joining the force. Then I'll be bringing some hurt.
Decided to bring my Salamanders to the table since I'm most comfortable in power armor. No love for the Orks this week, but maybe I'll throw down with them later on. My opponent was a Tau force and we played a short 770pt game. We rolled for the mission and it was a King of the Hill with Night Fight on the first turn. Although the player was new, he was a quick learner and it was nice for me since I had forgotten many rules myself.
I managed to nuke myself on my first turn by having my Librarian use Gate of Eternity and scatter a whole squad into difficult terrain, killing 5 of them, 2 of which were special weapons. In the subsequent turn, the rest of the squad was shot to death by Fire Warriors, leaving the Librarian alone. Fortunately enough, his Terminator Armor proved worthwhile and he survived without a scratch.
As I marched my other two tactical squads up to the objective, the Librarian assaulted the nearby Fire Warriors squad and tying them up for the remainder of the game. Slight opposition was met when the Tau Commander jumped in, by after a few whiffs with my Force Weapon, I finally killed him, passing my psychic test and killing him outright. The Librarian continued to tie up the fire warriors while the tactical squads controlled the objective. A bit shot up by the ended of the game, which was cut short at turn 5 due to the store closing, but they still got the job done.
Definitely looking forward to this weeks games. Eye'd up some of the other players while I waited around, gauging what I may need to take for the future.Overall I'm enjoying the points system. Start off with only Troops and HQ available and as you progress, Elites, Fast Attack and Heavy Support open up, as well as special characters. And a few more games and Vulkan He'Stan will be joining the force. Then I'll be bringing some hurt.
Vulkan He'stan
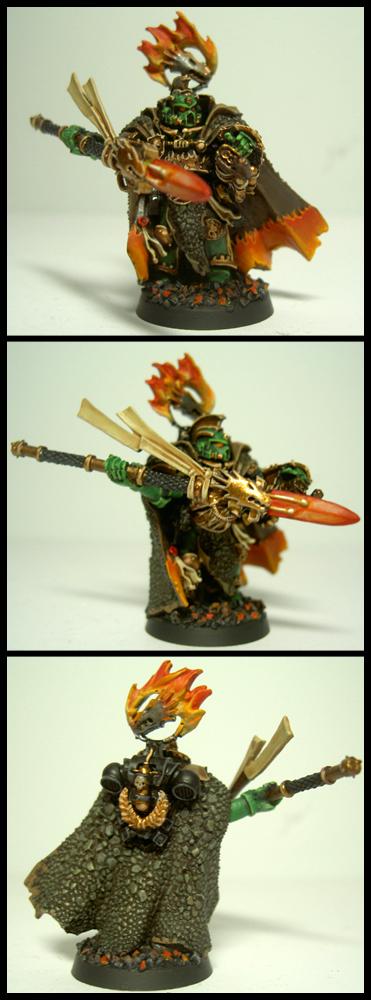
Finally done with this sucker. Quite a lot to do on this model and I'm fairly pleased with how it came out. Time to bring this guy onto the field and bring the pain!
Tuesday, October 25, 2011
Salamanders Captain
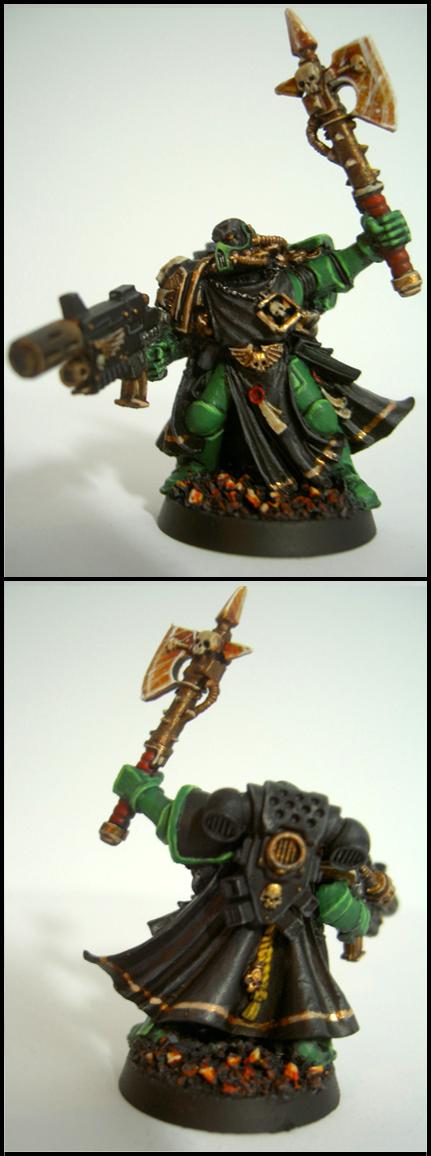
Recently stripped a bunch of old models, among them a '99 Limited Edition SM Captain. Easily still one of my favorite models to date so I decided to do it some justice and repaint him up nice and proper. I'm not a huge fan of how they changed Sallies to have a "daemonic appearance" with red eyes and jet black skin, which I think is just lame looking. So I tweaked mine lightly to give them fiery orange eyes, much like embers.
If I wanted to play demon looking things, I'd play Demons e__e.
Tuesday, October 11, 2011
Tutorial: Flesh Tearers Iconagraphy
A recent post on DakkaDakks spurred me to make a tutorial for making a buzzsaw for the Flesh Tearers Chapter Iconography.
Step 1: Get your base circular shape down. I recommend doing all the geometry work in pencil (mechanicals tend to work best). If you have any circular thigns to trace that suits the size of the buzzsaw (bottlecaps, vials,) or even better a Pencil Compass to get your exact size
Step Two: After you have your base color down, lightly divide the circle into sections with pencil, just like a pizza. For smaller saws I suggest less divisions since you may not be able to get in the detail with more teeth.
Step Three: Heres the detail work. Like in the figure below, draw the tooth edge. Starting at the tip of a division line, angle a line down (less than 45 degrees) and cut slightly into the next division. Then cut back up to the next division line point. You can either do this in pencil first or go right to the paint work, whatever you feel comfortable with.
Step Four: Repeat the process all the way around! Patience garners better results!
Step Five: Go in and fill in the surrounding color to the outside of the now formed buzzsaw.
Step Six: Get rid of the pencil lines (light erasing shall do) and toss in a blood drop. Now you have your Flesh Tearers symbol!
Enjoy!
Step 1: Get your base circular shape down. I recommend doing all the geometry work in pencil (mechanicals tend to work best). If you have any circular thigns to trace that suits the size of the buzzsaw (bottlecaps, vials,) or even better a Pencil Compass to get your exact size
Step Two: After you have your base color down, lightly divide the circle into sections with pencil, just like a pizza. For smaller saws I suggest less divisions since you may not be able to get in the detail with more teeth.
Step Three: Heres the detail work. Like in the figure below, draw the tooth edge. Starting at the tip of a division line, angle a line down (less than 45 degrees) and cut slightly into the next division. Then cut back up to the next division line point. You can either do this in pencil first or go right to the paint work, whatever you feel comfortable with.
Step Four: Repeat the process all the way around! Patience garners better results!
Step Five: Go in and fill in the surrounding color to the outside of the now formed buzzsaw.
Step Six: Get rid of the pencil lines (light erasing shall do) and toss in a blood drop. Now you have your Flesh Tearers symbol!
Enjoy!
Saturday, October 8, 2011
Who else seen Menoth say Yeah!
To me, it look like Menoth to me.
Recently picked up the Warmachine Two-Player Starter Kit, love it so far. First built and painted out of the box is High Exemplar Kreoss.
Much more to come in the near future!
Thursday, September 29, 2011
Getting Ripped on the Wrack
...well spiritually at least. Picked up a box of Menoth Wracks a few days ago and decided to to a quick tutorial of how I did them.
As always, before you start, paint in any spots missed by your primer. I had a few spots between the body and the wrack that were a bit tough to get to with the spray, but a some quick brushwork remedied that.
I prefer to work section to section rather than doing all my basecoats, all my highlights, etc, mainly due to the drybrushing for the metal. For this tutorial, I am using GW paints only due to that what I have and I didn't wish to buy more paint that I didn't need.
Fist I decided to tackle the Metal parts, as they were the majority of the model.I went with a dingy green look that I had done on Reznik's wrack. I liked how it came out so I figured I'd do the same for these.
So first, I started off with a mix of roughly 50% Boltgun Metal, 25% Catchan Green, 25% Black.
I then followed that up with a dry brush of Boltgun Metal, then highlights and scratches with Mithril Silver. I finished it up with a bit of rust done with an even mix of Tin Bitz and Blazing Orange.
I find that watering down my highlight paint helps me create more fine lines and scratches and avoids overly-bright highlights.
Once the metal was done and dry, I moved on the the body. I started out with a foundation of Tallarn Flesh. The GW foundation paints are suprisingly effective and coat on very well, which is especially good for this transition from black primer to flesh tone.
I then did a careful drybrush of Elf Flesh. Since the model had a lot of detail in the musculature and ribs, I found it was best to do a dry brush and let that bring out the details rather than a applying the second color normally.
To do the blood/worn skin around the shackles, I conveniently had some old GW Red Ink laying around, which I watered down and put right in. A red wash or even watered down Blood red would work equally as good. When doing parts like this, I found it looks best if after the red is done, go back over towards the end and carefully drybrush/blend it in so that there sudden color change.
After the skin was complete, I did the cloth which was Graveyard Earth with a highlight of a 50/50 mix of Graveyard Earth/Bleached Bone. After that I moved onto the hanging censers and helmet.
Those were done with an 50/50 of Boltgun Metal and Shining gold (I didn't have Burnished Gold), and then highlighted with a 50/50 mix of Mithril Silver and Shining Gold. I finished up with his little buddy perched on top, giving him a simple drybrush of 50/50 Codex Grey and Chaos Black.
And here is the finished result based and ready to go.
Hope you enjoyed this tutorial. I will most likely have one up for other Menoth pieces in the near future.
As always, before you start, paint in any spots missed by your primer. I had a few spots between the body and the wrack that were a bit tough to get to with the spray, but a some quick brushwork remedied that.
I prefer to work section to section rather than doing all my basecoats, all my highlights, etc, mainly due to the drybrushing for the metal. For this tutorial, I am using GW paints only due to that what I have and I didn't wish to buy more paint that I didn't need.
Fist I decided to tackle the Metal parts, as they were the majority of the model.I went with a dingy green look that I had done on Reznik's wrack. I liked how it came out so I figured I'd do the same for these.
So first, I started off with a mix of roughly 50% Boltgun Metal, 25% Catchan Green, 25% Black.
I then followed that up with a dry brush of Boltgun Metal, then highlights and scratches with Mithril Silver. I finished it up with a bit of rust done with an even mix of Tin Bitz and Blazing Orange.
I find that watering down my highlight paint helps me create more fine lines and scratches and avoids overly-bright highlights.
Once the metal was done and dry, I moved on the the body. I started out with a foundation of Tallarn Flesh. The GW foundation paints are suprisingly effective and coat on very well, which is especially good for this transition from black primer to flesh tone.
I then did a careful drybrush of Elf Flesh. Since the model had a lot of detail in the musculature and ribs, I found it was best to do a dry brush and let that bring out the details rather than a applying the second color normally.
To do the blood/worn skin around the shackles, I conveniently had some old GW Red Ink laying around, which I watered down and put right in. A red wash or even watered down Blood red would work equally as good. When doing parts like this, I found it looks best if after the red is done, go back over towards the end and carefully drybrush/blend it in so that there sudden color change.
After the skin was complete, I did the cloth which was Graveyard Earth with a highlight of a 50/50 mix of Graveyard Earth/Bleached Bone. After that I moved onto the hanging censers and helmet.
Those were done with an 50/50 of Boltgun Metal and Shining gold (I didn't have Burnished Gold), and then highlighted with a 50/50 mix of Mithril Silver and Shining Gold. I finished up with his little buddy perched on top, giving him a simple drybrush of 50/50 Codex Grey and Chaos Black.
And here is the finished result based and ready to go.
Hope you enjoyed this tutorial. I will most likely have one up for other Menoth pieces in the near future.
Tuesday, September 27, 2011
Tutorial: Big Choppas in a Pinch!
Some may wonder when opening a box of Ork Boyz and surveying your Nob options: "Where da BIG Choppas?!" Unlike the Nobz kit, the Ork Boyz kit does not offer any bits for the two-handed Big Choppas. Through some quick converting and readily available bits, I've converted these regular Nob-sized Choppas into Big Choppas.
With the bits offered to me in the Ork Boyz kit, I combined Nob Choppa arms and Choppas from the other Boyz Choppa arms (with the amount you get from both left and right arms in the kit, you should have extras.).
Cutting the Choppa handle right above the hand the hand gives you a decent amount of length to work with, then if need be, you can cut down from there if you want a shorter handle. Then I cut off the choppa blade and shaved it down to make it cylindrical. (2nd Nob displays that best). One some, I decided to fashion a hook from the axe blade, cutting it down until I saw fit. (1st Nob.)
Be sure to mind the thickness of the handle and ensure they match for the most part so it doesn't look too hodgepodge. As always, be sure to cut off any bits and nubs on the bottom of the Nob Choppa and get a smooth flat cut on your ends.
Above are some of the Big Choppa painted. Like all my metal, I started off with a base of Tin Bitz, then drybrushing Boltgun Metal over that, then finishing with a highlight of Mithril Silver, though Chainmail works just as fine.
In addition to Choppas, I also used other bits such as knives and Stikkbombs, all of which in the Ork Boyz Kit. This method is also ideal for converting Nobz from the AoBR Starter set, as they are quick fit models and are not readily customizable.
Have fun and happy modeling!
With the bits offered to me in the Ork Boyz kit, I combined Nob Choppa arms and Choppas from the other Boyz Choppa arms (with the amount you get from both left and right arms in the kit, you should have extras.).
Cutting the Choppa handle right above the hand the hand gives you a decent amount of length to work with, then if need be, you can cut down from there if you want a shorter handle. Then I cut off the choppa blade and shaved it down to make it cylindrical. (2nd Nob displays that best). One some, I decided to fashion a hook from the axe blade, cutting it down until I saw fit. (1st Nob.)
Be sure to mind the thickness of the handle and ensure they match for the most part so it doesn't look too hodgepodge. As always, be sure to cut off any bits and nubs on the bottom of the Nob Choppa and get a smooth flat cut on your ends.
Above are some of the Big Choppa painted. Like all my metal, I started off with a base of Tin Bitz, then drybrushing Boltgun Metal over that, then finishing with a highlight of Mithril Silver, though Chainmail works just as fine.
In addition to Choppas, I also used other bits such as knives and Stikkbombs, all of which in the Ork Boyz Kit. This method is also ideal for converting Nobz from the AoBR Starter set, as they are quick fit models and are not readily customizable.
Have fun and happy modeling!
Subscribe to:
Posts (Atom)